There are huge situations or purposes where you require high-quality live streaming.
Owning a Sony A7 III eliminates the need to invest in a high-quality webcam while allowing one to enjoy top-quality live streaming with fancy features.
However, you must know how to use Sony A7 III as a webcam and what the essentials are required.
As a result, we’ve come up with two of the most basic ways to use the Sony A7 III as a webcam.
These methods will let you enjoy high-end live streaming, allowing you to adjust some fancy features of the camera.
How To Use A Sony Camera As A Webcam
Following are the procedure of using Sony A7III camera as a high end webcam in two different methods:

USB With Imaging Edge Webcam Setup Method
The Imaging Edge Webcam is officially launched by Sony and works with Windows and macOS systems as well as being compatible with most of Sony’s camera models.
Hence, Imaging Edge Webcam software is a great way to use the Sony A7 III camera as a high-end webcam.
This software allows you to turn the digital camera into an HD webcam for live streaming while providing the benefits of a wide range of handy features.
However, the Imaging Edge Webcam can’t handle audio. So the user has to use the personal computer’s external microphone or built-in microphone.
Compatible operating systems:
- Windows 10 64-bit, Windows 11.
- macOS 10.14, macOS 11, macOS 12.
- PC with Intel or AMD processor.
First of all, download and install the Imaging Edge Webcam application.
Connect your Sony A7 III camera to the computer via a USB cable.
Make sure you have the Imaging Edge Desktop software installed first before connecting the camera.
Otherwise, the software won’t let the camera connect to the PC.
Then set the camera to an AUTO mode that you’ll need to change to video mode after launching the live streaming service.
Run the live streaming service on your PC. You may need to register an account or install extra software before launching the service.
Now set the Imaging Edge Webcam as the video source.
>> Is the Sony A7iii an Professional Camera
Useful Tips To Follow
The aspect ratio is set automatically to 16:9. You should disable the sleep mode of the computer while running the Imaging Edge Webcam.
Don’t unplug the USB cable of any device, like a headset or camera.
Plus, you should avoid changing the camera or releasing the shutter while running Imaging Edge Webcam.
Otherwise, the live view screen can interrupt attempting such an operation.
In case the live view is interrupted, you can still recover it by turning off the video of the web conferencing system and going to the Windows Start menu.
Here you’ll find the Imaging Edge Webcam and select its USB Reset to complete the recovery. After that, restart the camera and the web conferencing system.
>> How to Check Shutter Actuations on Sony A6000
HDMI Cable With Capture Card Method
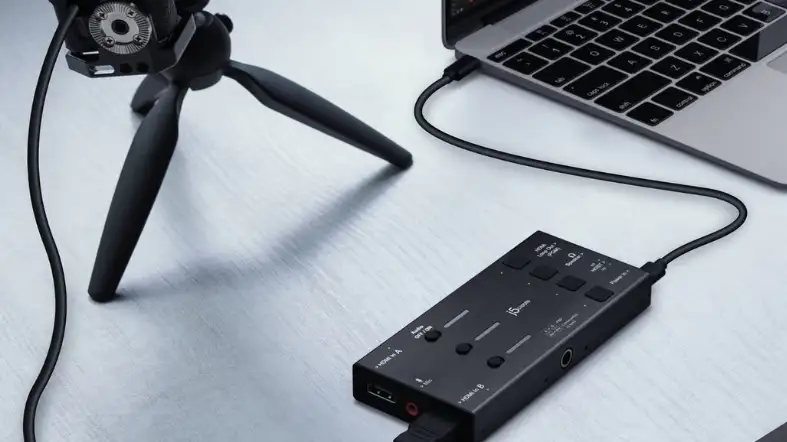
Fortunately, the Sony A7 III produces a clean video feed through its HDMI output.
Sony also has a webcam app that allows it to deliver a video feed that is well-matched with many programs.
However, you’ll require compatible software with your Sony A7 III for successful operation.
In this case, you can use Elgato Cam Link 4K as it is universally compatible with any meeting software like Skype or Zoom.
Plus, the software also works with commonly used streaming software like OBS Studio.
Setting Up The Camera And Computer
Your Sony A7 III camera should have enough battery life or be connected to a dummy battery via an AC adapter to receive power consistently.
Determine whether your device needs any sort of driver, software, or plug-in to use the camera as a webcam and install it immediately.
Connect your Sony A7 III to the Elgato Cam Link 4K through an HDMI cable. The Sony A7 III comes with a micro-HDMI port.
So you can use either an HDMI cable or micro-HDMI.
But make sure you have put the small side of the Micro HDMI cable into the camera’s Micro HDMI port and the larger side into the Elgato Cam Link 4K.
Then plug the Cam Link into a USB 3.0 port on the computer. Turn on the camera and run the webcam software on the computer.
A mandatory setting is that your HDMI output settings on the Sony A7 III camera must match the needs of the capture device or PC.
Since some devices allow recording only in Full HD, output the correct format for successful configuration.
Set your Sony A7 III to Movie Mode. Then, apply Continuous AF with Face/Eye Detection enabled. Manual exposure offers continuous imagery.
This is the basic process. Apart from that, use a standard picture profile if you default to HLG or S-Log3. That’ll help the image look right on the screen.
After plugging in, you’ll be able to select those devices as a camera option in the video-conferencing software.
>> How to Take Raw Photos on Sony A7iii
FAQs
Why The Need To Use A Sony Camera Rather Than A Webcam?
The key purpose of using a Sony camera as a webcam is to get greatly improved image quality.
Sony cameras are popular for their stellar video quality and are regularly used on film sets and in the gear bags of independent filmmakers.
These cameras allow you to enjoy better video for calls and meetings.
Which Method Is Right For You?
The USB with Imaging Edge Webcam setup method is preferable for enjoying better quality video calls even with an easier setup.
It’s also a low-cost method to use Sony’s A7 III as a webcam.
But applying the HDMI cable with the capture card method will be a better choice if you desire to enjoy Full HD streams or video calls.
Final words
After learning how to use Sony A7 III as a webcam, enjoying a professional look for live streaming or other purposes should be simple for you.
This not only increases the versatility of your Sony A7 III camera but also lets you enjoy high-quality live video for both personal and professional purposes, making the impact high-end.
Lastly, collect all the compatible essentials to enjoy the quick setup and perfect operation.